May 27 Restore Series

Lucky Statues

This may be TMI or Too Much Information, but I have been a hot sweaty mess this late Spring.  News Flash, I am having Hot Flashes.  And besides the sub-zero temperatures that I crave, I need some more support for these waves of heat.  Announcing the Cooling Breaths of Sitali (or Sheetali) and Seetkari. (see website for more informaiton http://yogawithsubhash.com/2010/09/15/sheetali-seetkari-pranayama),  Give it a go this summer whenever you feel the need.  In addition, I am going to buy one of those touristy hat fans.  


Sheetali and Seetkari – Pranayama to Control Stress and Blood Pressure 

In the last few posts on pranayama, I introduced the concepts of breath retention (kumbhaka) and the energy locks (bandhas). Essentially, these techniques can be used in conjunction with any of the pranayama techniques that I have talked about in previous posts. I will be covering some of these variations in future blog posts.
In today’s post, I would like to introduce you to two breathing techniques which are jointly labeled "cooling pranayama". They provide cooling not only at the physical level but also at the nervous and mental levels. They are highly effective in cooling the system during summer time. However, they can be practiced even during winter months as they calm the nerves down and also help release mental tension and stress. These pranayama techniques also help reduce blood pressure.

Seetkari Pranayama

The word "seetkari" (सीत्कारी) literally means the breathing technique that "produces the ‘seee’ or the ‘seet’ sound". In English, it is usually translated as the "hissing cooling breath".

seetkari

Step-by-step

  1. Sit in any comfortable cross-legged sitting posture with the spine upright, arms and shoulders relaxed.
  2. For the next few breaths, observe the flow of breath at the tip of the nose. This helps bring in a feeling of being centered and inward focused.
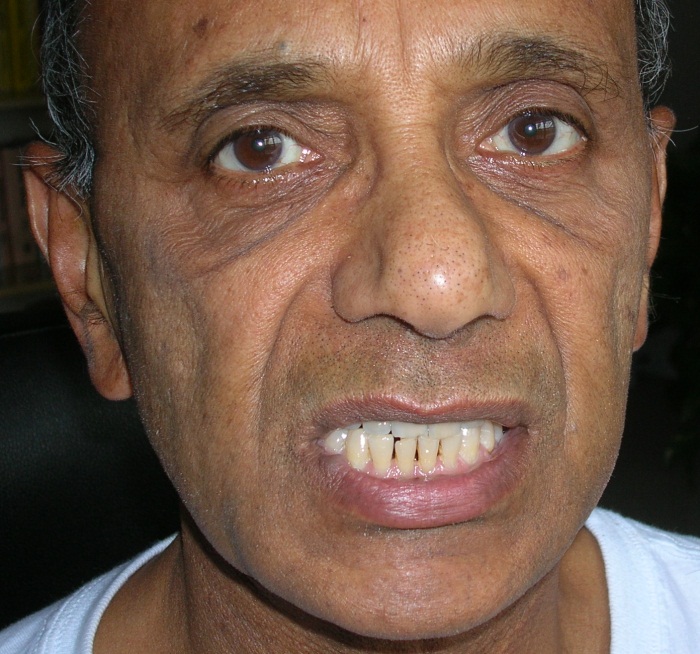
  3. Open the lips and bring the teeth together lightly.
  4. Take a long deep inhalation through the gap between the teeth.
  5. At the end of inhalation, lower the chin to the chest in Jalandhara Bandha and hold the breath for 6 to 8 seconds. Make sure that you retain the breath only as long as it does not impact the quality and depth of the following exhalation.
  6. When you are ready to exhale, lift the chin up, close the right nostril with the right thumb. Using Ujjayi breath, exhale slowly through the left nostril. This completes one round.
  7. Repeat for five deep breaths.
  8. At the end, bring the breathing back to normal and relax.

Sheetali Pranayama

The word Sheetali (शीतली) means "the one that can cool you down". The technique is very similar to the Seetkari pranayama.

sheetali

Step-by-step

  1. Sit in any comfortable cross-legged sitting posture with the spine upright, arms and shoulders relaxed.
  2. For the next few breaths, observe the flow of breath at the tip of the nose. This helps bring in a feeling of being centered and inward focused.
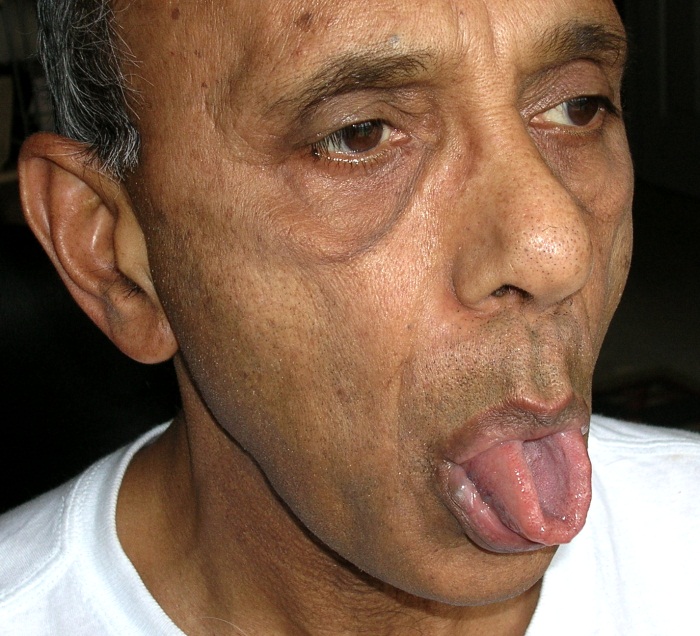
  3. Bring the tongue all the way out and roll it in the shape of a tube. Some people have problem creating this tube with their tongue. In that case, continue with the Seetkari pranayama, described above.
  4. Take a deep, long inhalation through the tube in the tongue.
  5. At the end of inhalation, lower the chin to the chest in Jalandhara Bandha and hold the breath for 6 to 8 seconds. Make sure that you retain the breath only as long as it does not impact the quality and depth of the following exhalation.
  6. When you are ready to exhale, lift the chin up, close the right nostril with the right thumb. Using Ujjayi breath, exhale slowly through the left nostril. This completes one round.
  7. Repeat for five deep breaths.
  8. At the end, bring the breathing back to normal and relax.

Benefits

Contraindications

Sheetali and Seetkari can be practiced by everybody. The only caution that you may observe is to avoid these techniques during the extreme cold days of winter.
Also, avoid these if you are suffering from a cold or congestion.

The Breath - Prana & Apana
(this article has been shortened, for full version with poses details, please go to http://www.yogajournal.com/practice/2585)

Find Your Roots

Move your energy downward and watch your Kraunchasana grow.
By Richard Freeman
The great eighth-century yogin and philosopher Shankaracharya said, "Yoga asana is that in whichmeditation flows spontaneously and ceaselessly, not that which destroys happiness." In other words, when yoga poses are well aligned, they feel so good internally that the mind is practically stunned with awe, and the breath flows right up the front of the spine into the spacious radiance of the body's central axis. The experience is beautiful and sublime. Realistically, our practices can rarely be called sublime. The mind and ego seem programmed to stay out of the central axis, making practice a superficial exercise in self-improvement rather than the precise observation of, and insight into, the nature of our body and mind.
An excellent way to counteract this tendency is to link the two basic internal patterns that control inhaling and exhaling. These are called prana (upward spreading breath) and apana (downward contracting breath). The prana controls inhaling; it is felt as an upward floating, spreading, branching, and flowering pattern. Its home is the core of the heart. The apana controls exhaling. It is the downward rooting flow, which contracts, or tones, into a seed point at the center of the pelvic floor. This small area in the perineum is also known as the mula, or root, in yoga. The poses in this series will increase your awareness of apana by bringing attention to the pelvic floor, which will help you feel rooted to the earth, grounded, and calm.
With each breath you take, prana and apana organize the movement of bones and muscles. Prana lengthens, or extends, the spine (as in a backbend) and brings the legs into internal rotation; apana rounds, or flexes, the spine (as in a forward bend) and spins the legs externally. In the sequence that follows, I strongly encourage you to go beyond the external forms of the asana and into the realm where prana joins apana. You can experience this joining energetically, by feeling how the two pull against each other as you breathe. And you can feel it physically by playing with the resulting extensions, flexions, spins, and counterspins that naturally occur in your spine and your limbs as you do the poses. By practicing this way, you will learn to cultivate the full spectrum of breathing and muscular rhythms that goes on deep inside your body, which will enable you to tap into the radiant nature of your core body and bring you into meditation.
To start this process, be mindful of your breath. In each pose, make the gaze of the eyes steady and soft, and empty the palate by relaxing the mouth into a Mona Lisa smile. Then begin to draw the breath into long, pleasant threads as you work in the pose. After some time with the breath flowing in this way, the four corners of your pelvic floor—the coccyx , the pubic bone, and the two sitting bones—will simultaneously drop, and the center of the pelvic floor will draw up like a flame into what's known as Mula Bandha (Root Lock), forming an intelligent base that brings the rest of your body into harmony. When the mind is distracted, the apana and the prana are not integrated, and the coccyx and the pubic bone will not pull down at the same time. Pay attention to dropping the coccyx, which strongly stimulates the apana pattern, at the same time as dropping the pubic bone, which strongly enhances the prana pattern.
The strong work of grounding, connecting to the earth, and of spiraling and counterspiraling that you'll do in this sequence is like laying down a root to hold on to the earth. If you can do this work with a sense of kindness and compassion, and with an empty palate, the root will sprout and, as it grows, it will bear flowers of openness and natural insight.


The Poses
Supported Twist
Props: bolster, 2-4 blocks, 4 blankets, neck roll, eye pillow
Extras: blanket for warmth
Benefits: Allows breath to come in to the rib cage and belly more freely. Detoxifying. Can reduce high blood pressure. Relieves fatigue and insomnia.  Safe for a Prenatal twist.

This can be a very prop intensive pose but once you are in it, it is worth it.  Begin with right side of body, place the bottom of your right foot against the wall with leg extended. Left leg is bent at a 90 deg. angle and propped up with two blocks and a bolster with maybe a blanket on top. at least two blankets, S-fold blankets, and/or pillows placed along spine for support, lengthwise.  Extend your left arm out to the left side and lay it on a smaller stack of blankets either s-fold or triple-fold out to your side.  Right arm extends out to the right.  This means the left arm is at a higher elevation than right. Head can remain neutral to ceiling or turn to one side.   Extra blankets can be placed in spaces that need more support.  Neck roll for cervical spine and eye pillow.
*we are digging placing the arms in Goddess pose (not pictured) so try that one out as well. Place blanket support under arms. 

Supported Bridge
Props: 4 blankets, neck roll, eye pillow, can also use bolster for more stretch
Extras: blanket for warmth
Benefits: Expands the chest muscles, opens the lungs, balances the glands, quiets the nerves and releases tension in the nervous system, increases oxygen intake to the brain, can stimulate the immune system (thyroid)

Lie on your back with knees bent and feet flat on the floor. Lift butt and slide the stack of 2 or 4 blankets under the base of your spine. Find a comfortable position, then let the upper back release on the floor. Arms are relaxed at sides or resting on belly. Feel chest and belly rise with each breath. Roll gently to one side when done and inhale up to seated.

Variation
Props: 4 blankets, neck roll, eye pillow
Extras: blanket for warmth, strap for legs
Benefits: Expands the chest muscles, opens the lungs, balances the glands, quiets the nerves and releases tension in the nervous system, increases oxygen intake to the brain, can stimulate the immune system (thyroid)

Make two stacks of two double or triple fold blankets on top of each other.  Placed the two stacks end to end. Height and width of blankets can be adjusted for your body.  Sit down straddling one of the stacks and carefully lower yourself down onto forearms, swing your legs on to other stack and lie down. Neck roll is placed at top stack, lower shoulder and head to floor.  Neck is supported by neck roll and head is completely flat on floor with forehead and chin on the same plane.  Arms stretched out to the sides. The stacks of blankets should be long enough for the entire body to be resting on including the feet.  Option to put strap around calves if the legs are rolling outward.  Stay for up to 15 minutes. Roll off blankets slowly and bring knees to chest with some movement.

Nesting Pose

Props: blankets, bolster
Benefits; Nurturing, sense of security, well-supported pose to regulate the nervous system, good for when you are feeling anxious, keeps body in alignment, supportive for the spine, hips, shoulders, head.  Allows for optimal healing and sleeping position. nurturing, sense of security, optimal for sleeping

Create a big enough folded blanket to place between the knees to align the legs in Tadasana. Add a folded blanket to rest your top arm on. Recline on a side that is comfortable, resting your head on a blanket. A neck roll can go under the ankles for support.  Bolster can rest along spine for further support and grounding. Finally, cover yourself with a blanket from head to toes.  Sink down with each long exhalation.  Mantra to accompany pose "I am safe, I am supported".


Labels: , , , ,